|
|
|
Tutorial 1: California Poppies
With today’s digital cameras, scanners, software, and desktop printers, anyone can edit photographs make nice prints of their snapshots. But we can do much more than that. Here I will talk about how with a bit of imagination you can turn a photograph into a work of art.
The tools we will use enable great artistic freedom in the design and creation of the final image. You can try out different things and then undo them and try again. You can create multiple versions of the same image, with different effects (I usually do!). This is a freedom that does not exist with traditional artistic media.
You can start with either a film camera or digital camera. With the film camera there is the additional step of having to scan your picture. I use both digital and film cameras. The picture we will work with here started out as a 35mm color slide on Fuji Provia 100 film. It is a field of Califorrnia poppies captured last spring near my home in California. The California poppy is the state flower of California.
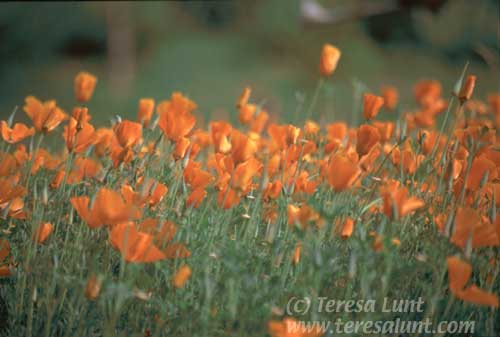
Figure 1 shows the scan I took of the color slide. The scan was made using my Minolta Dimage Scan Speed slide scanner. It is an older scanner, around 2 or 3 years old. The scan is at 2400 dpi, and the scanner does not give you a lot of control over the scan exposure. Even if the scanner software gives you control, it is generally applied after the scan, to the scanned image. So you may as well do such fixes in Photoshop because you get much better control. Figure 1 shows the scan after I made adjustments in Photoshop for color and brightness to match the slide as closely as possible. You can make these adjustments in any image editing software, even the most inexpensive.
|
|
|
|
 |
| Figure 1 |
|
For doing the kinds of artistic manipulation we will do here, you do not need to get the most expensive or fanciest scanner. That is because the manipulations we will do will smooth out imperfections in the scan and will actually remove detail: we are aiming at a painterly effect rather than for photo realism! There are a few inexpensive desktop slide scanner models available. Some desktop flatbed scanners come with or have optional slide scanner attachments. If you have a flatbed scanner, you could even start with a scan of a color print. Or, if you do not want to do your own scans, some photo finishing stores will scan slides or negatives for you very inexpensively.
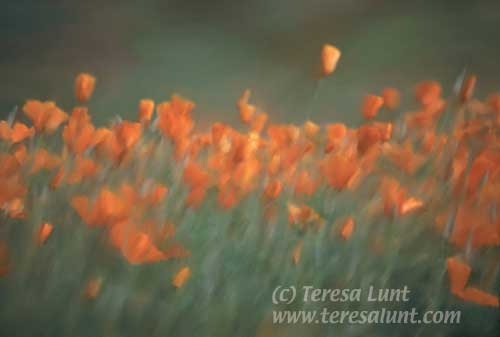
This image in Figure 1, while attractive, looks too literal for me. I find the amount of detail in the foreground foliage distracting from the subject of the picture, which is the poppy blossoms. Plus there are ugly black blotches and other distracting artifacts in the background. So I decided to soften the image by using a painting program. Figure 2 shows the results of painting over the image in Painter Classic using the water brush in the "just add water" mode. I got Painter Classic free with my Wacom tablet a few years ago. It is an old, limited version of Painter, and all I use it for is the "just add water" brush. This brush has the effect of adding a wash over your picture. You can choose the brush size. If you choose too big a brush, you just end up creating a big blur. Just like adding water to a watercolor painting, too big a brush is like adding too much water and causing all the colors to run together. Instead, choose a small enough brush to retain some detail, yet large enough that you can paint the entire picture in a reasonable amount of time. You want your brush strokes to mimic the content of the picture. In my case, since the poppies are blowing in the wind at an angle, I made my brush stokes follow this angle. I also wanted to smooth out the background, so I used a bigger brush there. Notice how I also got rid of the large black sections that were in the background.
|
|
|
|
 |
| Figure 2 |
|
A pen input device is indispensable for this kind of detailed work. If you tried to do this with a mouse, you would not have enough control, and the resulting picture would be noticeably poorer quality. You can purchase the cordless pens and tablets quite inexpensively, and they come with fun software not only for painting but for distorting and manipulating the picture. If you buy a tablet, get one of the smaller sizes. The larger ones just take up a lot of desk space, and they are actually more trouble to use, since you have to cover a much larger area with your drawing hand for the same picture size. With the smaller tablet your hand motions can be more economical. The feel is exactly like drawing on paper. The tablets are pressure sensitive so that you can control the effects by how hard you press. I like my tablet so much that I bought the smallest one available (a Wacom Graphire 4"x5") for my laptop so that I can take it with me when I travel.
Figure 2 looks like a watercolor painting. Note how in addition to the smooth, dreamlike quality there is also a loss of detail and a muted contrast. But I wanted a bit more detail than a watercolor can provide, and I wanted a brightness range similar to the original slide. So I some adjustments to Figure 2 in Photoshop. I darkened the image and increased its saturation and contrast. Again, these adjustments can be made in any image editing software. But I still wanted to add back some detail. I can get this detail from the original image (Figure 1).
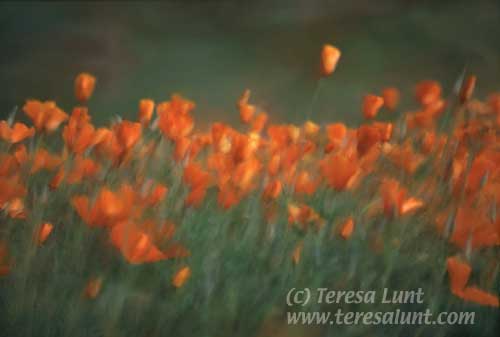
To do this, I opened both Figure 1 and Figure 2 in Photoshop. Selecting the "move" tool and holding down the shift key, I dragged Figure 1 onto Figure 2. That puts the original photograph as a layer on top of the watercolored image. (Holding down the shift key when you make this move ensures that the two layers will be perfectly centered on each other.) Now what I wanted was to blend these two images together. You can experiment with the opacity of the layers and the blending modes to get the effect you like. I chose the "multiply" blending mode with an opacity of 35%, and I also greatly lightened the top layer (Figure 1) and very slightly lightened the bottom image (the watercolor image) using "curves." Otherwise, using the multiply mode would result in too dark an image. Doing this I was able to add just a bit of detail back into the watercolor from the original photograph. You can see in Figure 3 that the added detail is in the foreground foliage and the poppy blossoms, but the background is still nice and smooth. Even with this added detail, there is not so much detail that you lose the painterly feel. At this point I flattened the image, which merges the two layers into one.
|
|
|
|
 |
| Figure 3 |
|
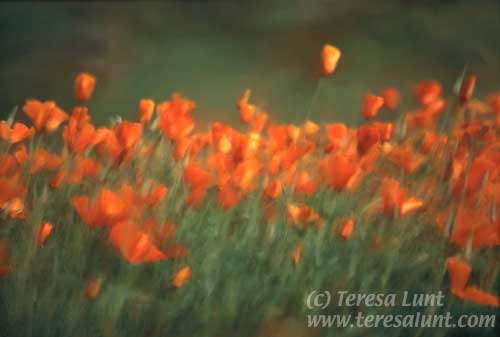
Next I wanted to adjust the color. There are many ways of doing this, but my favorite is the channel mixer. This is the most difficult to become adept at, so you just have to experiment. The channel mixer allows you to mix the information from different color channels (red, green, blue). You can look at each of the three channels separately to get an idea of what will happen when you mix them. What I did was to increase the red channel by adding some of the green channel to it, thereby intensifying the color of the poppies, and then I intensified the greens by adding some of the blue channel to it. I also wanted to add some contrast to the picture and tone down its intensity somewhat, so I used the color balance tool to add some blue to the shadows and a bit of red to the highlights. You can see the results in Figure 4. Another, perhaps easier way, to make color adjustments is with the hue/saturation tool. There you can select one of six colors, and using a slider you can adjust its hue. There are even controls to broaden or narrow the range of color that is adjusted with each slider. This is a very powerful tool. You can achieve somewhat different effects using each tool, so it is partly a matter of taste and partly a matter of which you feel more comfortable with. Don’t expect to get it right the first time. With some practice, you will be able to get predictable results.
|
|
|
|
 |
| Figure 4 |
|
If you compare the original with the final image, you can see that we took a rather ordinary image and made it into a piece of art!
|
|
|
|
|

|
|
| Send an e-card! |